Open topic with navigation
Generating FPGA Bitstream
This section shows how to generate the bitstream of the M3602A FPGA hardware projects.
1. Open the M3602A FPGA software.
2. Add IPs and connect them up within the hardware project.
3. Save the project.
4. Check the configuration connections to the server. File > Settings. The Configuration dialog box appears:
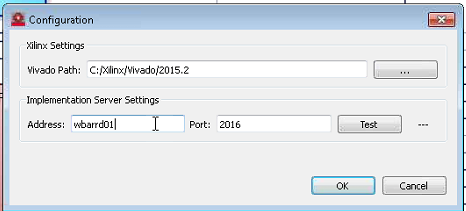
Configure the server connection settings:
- Vivado Path to the Vivado 2015.2 software
- Implementation Server Settings (check these settings with information received on purchasing the M3602A FPGA software):
5. Click the Test button to confirm that the connection is OK.
6. Launch the Generate Firmware process by clicking the  icon.
icon.
The FPGA compilation is a two step process. The compilation is carried out at first on the local PC, after which the compilation is continued on the cloud server.
7. The FPGA Hardware Build dialog box appears.
.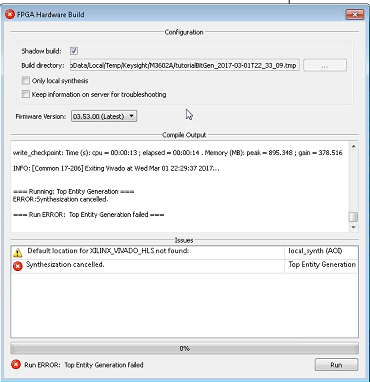
The dialog box has several settings:
- Shadow build: Check this if wishing to create a shadow build of the hardware project. Shadow build means the software will use a build folder inside the temporal path of the system. However, it can be specified to a different folder by deselecting this option. By default, it will be created within the hardware project folder.
- Build Directory: Make sure the path to the folder shown is where it is wished to have the firmware build file deposited. It can be edited by deselecting the shadow build option. The build directory path is shown in red text to alert that the target folder does not exist and that it will be created when the compilation runs.
- Only Local Synthesis: Check this box only if wishing to launch the local synthesis step. It means the software will only synthesize the hardware project on the current computer, and will not try to connect to the cloud compilation server for compiling the whole project. So, with this option, it will never be receiving a bitstream reset file. However, this option could be useful if it is only wanted to check if the project is synthesized successfully. A correct local synthesis result is necessary for continuing the compilation using the cloud.
- Keep information on server for troubleshooting: Check this if wishing to have a copy of the compilation results saved on the server. After compilation, the build files on the server are erased. Checking this retains those files for troubleshooting.
- Firmware Version. This shows the versions of firmware available. It is important to have the same firmware version as the module that the FPGA bitstream was created for.
8. After these settings have been checked and applied, click the Run button.
During the compilation process, messages are seen in the Compile Output window of the FPGA hardware Build dialog box. Messages can also be seen in the Issues window of the FPGA hardware Build dialog box. At the bottom of the dialog box is the compilation progress bar. When this gets to 20%, the compilation is taken over by the server. As the compilation proceeds, some common errors may be observed in the Issues window. See Generating FPGA bitsream.htm.
9. If the compilation is successful, the bitstream files with extension “sbp” will be deposited in the “bin” folder inside the data project folder. See 1.2.11 Project directory structure for more details.
Build Errors and Warnings
- [3] "Not supported product": It is possible the server does not support the product under compilation. This error should not happen when using the software available for the products.
- [4] "Project incompatible: ": The hardware project version is incompatible with the current firmware version of the module. It will be needed to create a new hardware project for implementing hardware projects with this module.
- [5] "Firmware version of card is not compatible": It is needed to update the firmware of the card being used.
- [6] "The implementation server is temporarily unavailable. Please try it later. We apologize for the inconveniences": This message may be seen if the server has many implementations in progress.
- [7] "You have reached the maximum number of simultaneous implementations": For example, if two compilations were run at the same time, this error would be seen as only one simulation implementation is allowed.